Replacing a car battery is easy to do and will take about 20 minutes in most cases, this job can be done using everyday tools. Please wear protective gloves and eyewear when working with a battery, also do not touch your eyes or clothing until you have washed your hands. This detailed guide will walk you through each step to ensure a safe and effective battery replacement.
Tools and Materials Needed
- Replacement 12-volt automotive battery
- Socket wrench set (with various socket sizes)
- Battery terminal puller (optional)
- Wire brush or battery terminal cleaner
- Baking soda and water solution (for cleaning)
- Battery terminal cleaner
- Gloves and safety glasses
- Shop towels
Safety First
- Ensure the vehicle is turned off and the keys are removed from the ignition.
- Work in a well-ventilated area to avoid exposure to battery fumes.
Before You Begin
When a battery goes bad it can expel acid around the battery case, box and cables. This acid is corrosive so don't get it on your clothing or skin. It's a good idea to wear rubber gloves like you would use to clean your household oven, also put on safety eyewear and old clothing. By sprinkling baking soda over the battery and then rinsing it with water will help neutralize the acid and clean the area before work begins.
Keep Alive Battery Voltage
Cars and trucks built after 2018 (about) must have a "Keep Alive" battery to hold 12 volts inside the electrical system for computer memory and programming proposes. This can be done by installing a 12 volt power supply through the cigarette lighter or attaching it to the battery cables directly which is shown in the video below.
SPONSORED LINKS
Remove Old Battery
1. Though appearances may vary slightly for each car, the process is virtually the same. The battery location will be under the hood in most cases but some cars may have it in the trunk or under the rear seat. Record the radio stations for re-entry as they will be lost once the electrical power is disconnected.
2. Use an 8mm or 10mm wrench to loosen the bolt for the negative cable end, this cable will be black or have (-) sign near it, you might need to give a twisting motion to help remove the cable. Be careful not to touch the wrench to the positive side of the battery to avoid a short circuit. Always undo the negative side first because the positive side is more prone to shorting to ground via any metal in the area. Push the cable away to avoid accidently reconnection back onto the terminal.

3. Undo the positive side cable, this will normally be a red color and identified by a (+) sign near the terminal connection and may have a red plastic cover over it. Use a wrench or ratchet to loosen the cable end, at this point there is no chance of creating a short circuit because the circuit is no longer live with the disconnection of the negative cable.
SPONSORED LINKS

4. Some manufacturers have a battery cover which now can be removed once the cables have been disconnected. This will also allow you to gain access to the battery hold down bolt. This cover should be cleaned before re-installation with water and soap to remove any acid residue that might be present. Locate the hold down bolt or J bolt nuts which are either at the top or bottom of the battery mounting box.
If the hold down is at the bottom it with only require one bolt to be removed, while a J bolt style of mount will require two nuts to be removed. On a bottom bolt style of mount use a long extension and ratchet to help in the removal. These bolt sizes include 8mm and 10mm. There will be a plastic wedge piece that will also need to be removed as well.

5. While using gloves, grasp the battery and wiggle it slightly to break it loose from its mount, then hold tight as you lift the unit from the vehicle. Brace your knees and back for this step due to the weight of the battery. Once the battery has been fully removed use baking soda and a garden hose to fully wash the area free from acid. This will also prevent corrosion of metal and wiring which could be routed below the battery box.
SPONSORED LINKS
Install New Battery
1. Now that the old unit has been removed, compare it to the new battery while checking the size, negative and positive terminal orientation, cold cranking and reserve amps which should meet or exceed the old battery.

2. While firmly holding the new battery, gently lower it into position. Be mindful of the terminal orientation so the electrical cables will attach to the corresponding positive and negative cable. Once the new unit is in place, wiggle it to ensure it's down into the box mount.

3. Then lower the mount wedge, or battery hold down bracket and J bolts into place and secure the battery, these bolts only need to be wrist tight. At this point you should see and feel the battery get tight within the battery box. Wash these parts with soap and water to remove corrosion before reinstalling them.

SPONSORED LINKS
4. Remove both plastic terminal covers of the new battery which are used to prevent damaged and shorting while in shipping or installation. The terminals should now be clean and ready for the battery cables to be installed. Set the cover (if applicable) back into place before the cable installation.
5. Use a battery terminal cleaning tool with a twisting motion which will create a fresh metal surface within the cable end and aid the transfer of voltage to the car. Take note: This cleaner has a taper fit and will only work correctly in one direction. Complete this operation by cleaning both negative and positive cable ends, a small wire brush will work for this as well.

6. Install the positive cable first, tighten the nut while holding the end downward on the terminal to help the connection, to ensure a proper installation wiggle the cable end slightly. Once tight reinstall the positive cable protective cover which helps prevent accidental short circuits when working inside the engine bay. Do not reverse polarity, (attach the positive cable to the negative side of the battery, or the negative cable to the positive side). This will cause major electrical problems such as shorting out the alternator, main computer or other controllers inside the vehicle.

7. Finally, install the negative cable end onto the battery terminal and tighten while holding downward. Check the cable end for tightness by giving it a twisting motion. Wipe away any dirt or metal shavings from the cable end cleaner and double check your work and you are all set!

Final Notes
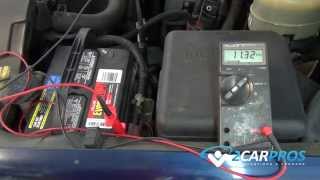
- Once the replacement is complete it's a good idea to check the alternator voltage output using a voltmeter. Also, observe the electrical system warning light or gauge this will ensure the operation of the alternator.
- The old battery is completely recyclable, contact your local recycling station, auto part store or repair garage to dispose of properly. Do not discard batteries into landfills.
- Regularly check the battery terminals for corrosion and clean them as needed.
- Ensure the battery is securely fastened to prevent vibrations and movement.
- Keep the battery and surrounding area clean and free of debris.
Watch the Video!
Please watch this video of the job being done to glean additional helpful information.
SPONSORED LINKS
Credits
This guide knowledge base was created by the 2CarPros Team, and by Ken Lavacot: Automobile repair shop owner and certified master automobile technician of over 30 years. If you have question or need help please ask one of our experts we are happy to help. Please visit our 2CarPros YouTube Channel.

Article published 2024-05-15
SPONSORED LINKS